
Do you want to Download and Install NVIDIA RTX Voice on GTX GPUs?. Then, this article will help you to do so.
Do you want to eliminate background noise from your voice chats and audio/video recordings? Then, RTX Voice App can help you with that. It was designed primarily for NVIDIA RTX 20-series GPUs. By reducing unwanted background noise, it improves audio communication. AI is used in the app to intelligently modify noise.
As per NVIDIA, this app uses Tensor cores built into its RTX GPUs to accomplish this feature. There is a file tweak that enables users to run RTX voice on non-RTX GPUs. However, you do not have to do that. The GeForce GTX GPU now officially supports RTX Voice, since NVIDIA patched it to run on the GPU. Yes, you can now use Nvidia RTX Voice on GTX GPUs Easily.
What is RTX Voice, and why is it so important?
The RTX Voice App will be a game-changer if you’re recording audio or live streaming, or even chatting on Zoom or Discord. It does eliminate background noise completely and focuses only on the main audio. Particularly it cuts out keyboard (mechanical keyboard) sounds, background fan noise, and all kinds of ambient noise from your surroundings. All is possible because of NVIDIA’s AI capabilities. I especially use RTX Voice when I am recording something through OBS Studio.
That’s not all, RTX Voice also lets you configure output devices as well. So it works amazingly well with incoming audio. For instance, If you’re on a video call and you’re noticing a lot of audio disturbance from another person’s side. Then, by turning on RTX voice for the output device you can remove background noise from incoming video. Basically, If you’re attending lots of meetings these days at home, and if you have an NVIDIA Graphics Card. RTX Voice will be a magical experience for you then.
The RTX Voice app works with these apps.
RTX Voice App works flawlessly with streaming services like Streamlabs OBS, OBS Studio, Twitch Studio, and Discord. However, it is not limited to these clients only. You can use RTX Voice in almost all popular video calling services like Zoom, Microsoft Teams, Slack, Skype, and WebEx. RTX Voice App also works with video games as well. I have tried it in Apex Legends and Valorant. So if a game does support voice chat, then you can configure RTX voice for it.
I have created a list of services that currently supports RTX Voice.
- All Multiplayer Video Games
- Discord
- Google Chrome
- OBS Studio
- Streamlabs OBS
- XSplit Broadcaster
- XSplit Gamecaster
- Twitch Studio
- Battle.net Chat
- WebEx
- Skype
- Zoom
- Slack
- Steam Chat
- Microsoft Teams
( Microsoft Teams, WebEx, Skype, Zoom, and Slack users might notice some issues. Because for GTX GPUs App is new, and kind of in the beta state.)
Contents
Install and Use Nvidia RTX Voice on GTX GPUs
Note: NVIDIA RTX Voice App might not work with USB Condenser Microphone. So do use a headset instead.

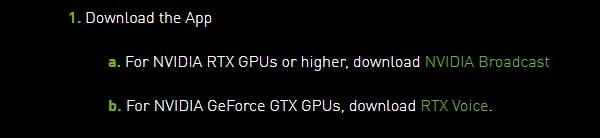
If you’re using NVIDIA RTX GPU or higher then you need to download NVIDIA Broadcast App. But, NVIDIA GeForce GTX GPUs can directly download RTX Voice App from the official site. The app size is 328 MB.
Note: Before installing RTX Voice, make sure your graphics card driver is updated.
- First, visit the NVIDIA RTX Voice Setup guide page. And, from “Table Of Contents” click on the setup guide.
- You will now find the RTX Voice download link for GTX GPU in the setup guide section. Click on RTX voice to download.
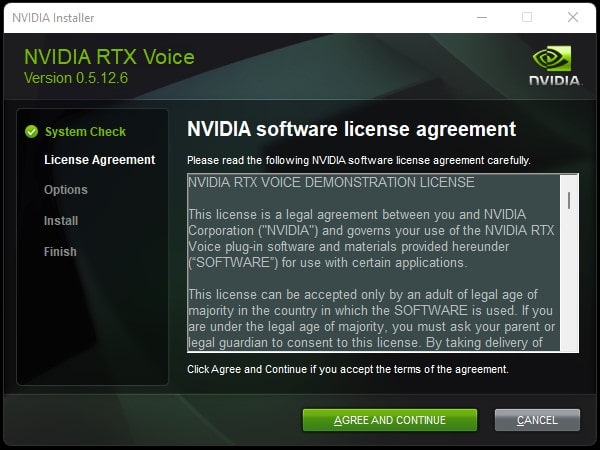
- Once the file gets downloaded, run NVIDIA RTX with administrator privileges. Right-Click on the setup file and run as administrator.
- The setup window will now appear, click on “agree and continue”. NVIDIA RTX Voice Application and Driver will now start installing.
- After Installation setup will ask you to restart the computer. Click on Restart Now.
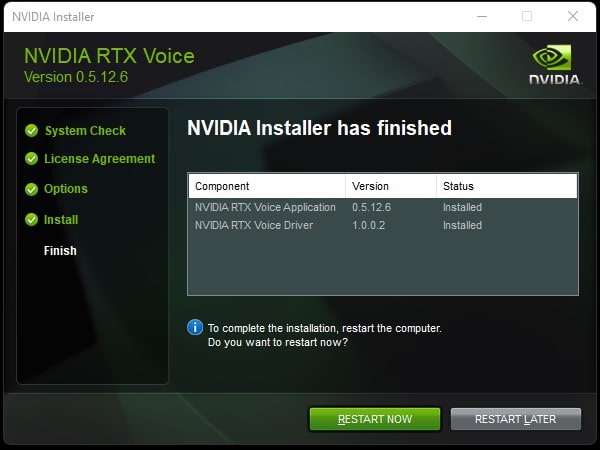
That’s it, RTX Voice is now installed successfully. Now you have to configure it.
How to set up and use RTX Voice.
- Open the RTX Voice App after it has been installed. In case the app does not open, click the icon from the system tray. Make sure to run the app as administrator else RTX Voice will not work.
- In order to use NVIDIA RTX Voice, you must first configure your default input and output devices. Select your microphone from the input device. Select your headset or speakers under the output device.
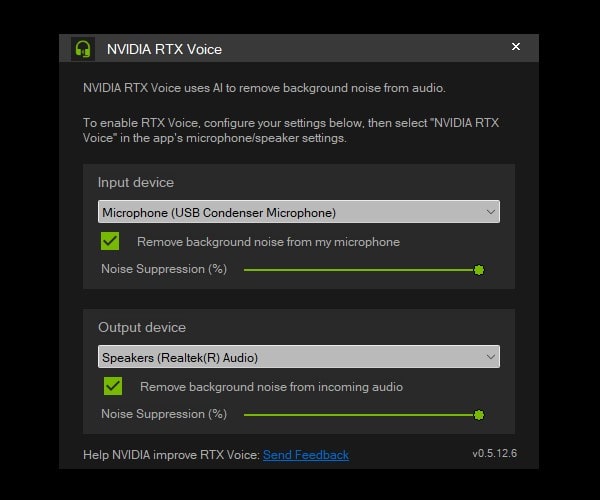
- After that, enable the Remove Background Noise option for the microphone and incoming audio. This option will enable NVIDIA’s AI to remove all sorts of background noise.
- Also, you can adjust noise suppression levels according to your needs.
- Once, the RTX Voice setup process gets done. You can Configure your voice chat app.
Test RTX Voice using Voice Recorder App.
You can also test NVIDIA RTX Voice using Voice Recorder App.
- First, open sound settings. Right-click on the speaker’s icon and then click on sound settings. Click on Sound.
- Now, In the input device do select NVIDIA RTX Voice as a microphone.
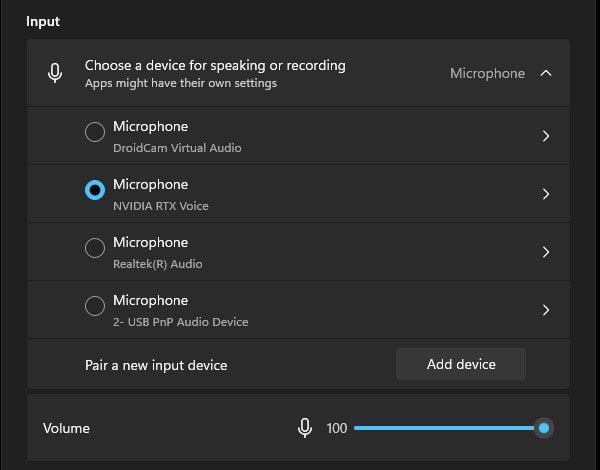
- After that, open the voice recorder App and record audio to check.
- If in voice recording no background noise comes. That means RTX Voice is working flawlessly with your GPU.
Set up NVIDIA RTX Voice on Discord.
- Open Discord App, and click on Settings (cog wheel). Click on Voice & Video.
- Now, in the input device select Microphone (NVIDIA RTX Voice). And, in the output device select the Speakers (NVIDIA RTX Voice) option.
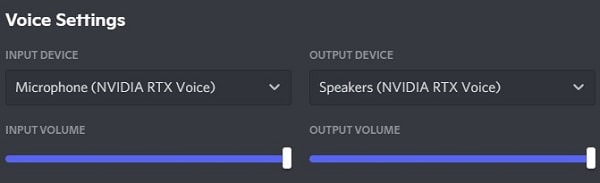
- After that, scroll down and disable the noise reduction option from the voice processing section.
- That’s it, you can now test your audio. Hopefully, it will eliminate all background noise.
So that’s how NVIDIA RTX Voice for Apps can be configured. All you have to do is go to the app settings and select RTX Voice as input and output. Ensure that NVIDIA RTX Voice is running in the background.