If you want to start your own Blog or Website, undoubtedly WordPress is an excellent platform. WordPress gives you so many customization options through plugins. And yes, there are various WordPress hosting services available to choose from. But undoubtedly, DigitalOcean and Vultr are the two major cloud hosting providers. Especially, DigitalOcean gives you one-click WordPress install options. But, I will suggest you first install CybelPanel on Ubuntu. This will auto-install LiteSpeed Server. And, after that, on CyberPanel, you can install WordPress with LSCache Plugin.
What are CyberPanel and OpenLiteSpeed (OLS)?
CyberPanel is basically a control panel, which is specially designed for LiteSpeed servers. And, you can use CyberPanel for free with OpenLiteSpeed. Which is an open-source web server. CyberPanel does provide a one-click SSL option, with it you can install Let’s Encrypt SSL for free.
Moreover, It also allows for managing multiple websites. And, offers One-click Backup and Restore option for your WordPress Blog/Websites. You can change the PHP version and can access the file manager through it.
So, here’s how to Install WordPress on CyberPanel with OpenLiteSpeed and SSL on DigitalOcean.
Contents
Install WordPress on CyberPanel with OpenLiteSpeed
Create a Droplet on DigitalOcean
First, we are going to create a droplet on DigitalOcean. Droplets are nothing but web servers. Or, you can say Linux-based virtual machines (VMs) running on virtualized hardware. Once you create a droplet, you will get an IP address to access the server.
Here we are going to install Ubuntu on a Droplet with CyberPanel. And, it will also install OpenLiteSpeed, PHP, Rainloop, PowerDNS, Radis, and Memcached Extension. Rainloop is an open-source webmail client. And, you can use Radis and Memcached later in LSCache Plugin to enable object cache.
- Login to your DigitalOcean Account. Or, Do Sign Up on DigitalOcean using the following link. And, you will get $200 in credit over 60 days.

- Click on Create > Droplets.

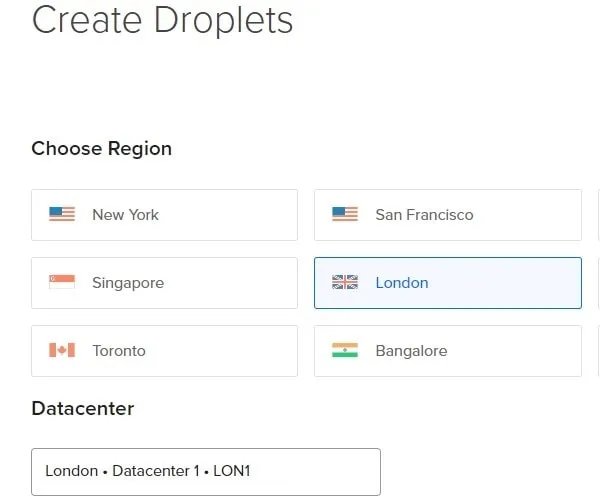
- Create Droplets screen will appear, first you have to choose a region. Do choose the region closest to your target audience.
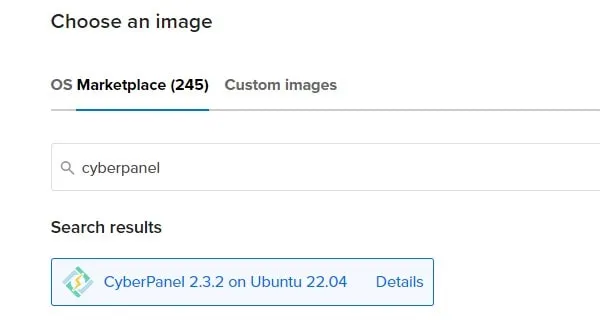
- Scroll down and click on Marketplace. And, do search for CyberPanel. Once you find CyberPanel click on it to select.
- CyberPanel 2.3.2 on Ubuntu 22.04 will get selected.
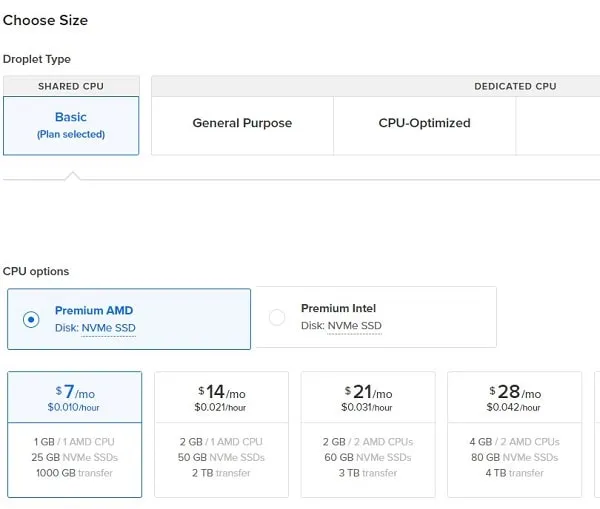
- Next, choose droplet type, you can keep the basic selected. Or, you can choose as per your requirement.
- After that, from the CPU options select between Regular or Premium Intel/AMD CPU. As per my research, the Premium AMD CPU performs better.
- Next, do select your hosting plan. You can start with a $7/month plan if you opted for the Premium AMD CPU.
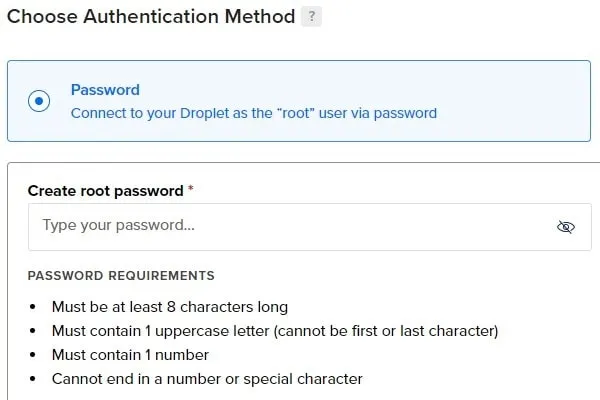
- Scroll down and it will ask you to “Choose Authentication Method”. You can either set a password or an SSH Key. Setting up a strong password will be a good idea.
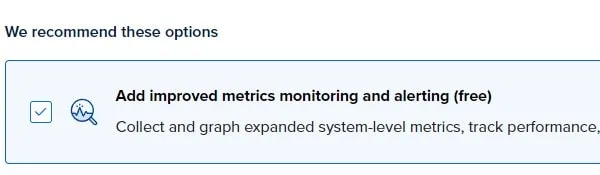
- After setting up a password, do enable the “Add improved metrics monitoring and alerting (free)” option.
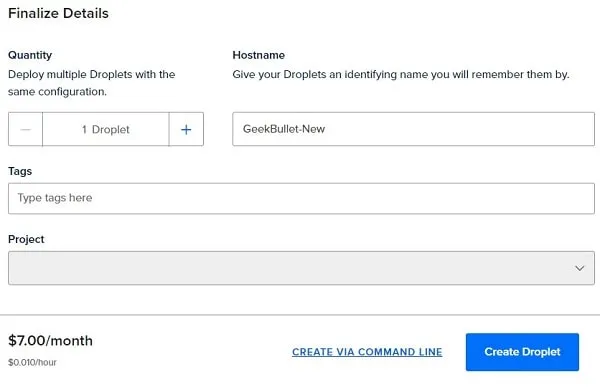
- Next, in the Finalize details section, enter your blog/website name in hostname.
- Click on Create Droplet.
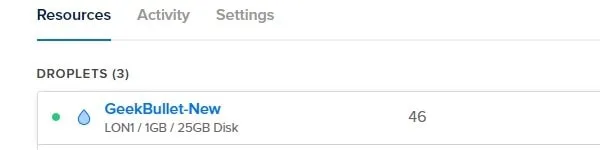
- You will now see a blue progress bar, keep patience. And, after a few seconds, you will see a droplet with a public IPv4 address.
Setup DNS
Next, you have to point your domain to your Droplet public IP address. So that, using your domain you can access your DigitalOcean server.
- In my case, I bought my domain from Google Domains. So, I added Digitalocean name servers to Google Domains. By doing this, I can point the domain to the IP address easily within Digitalocean.
ns1.digitalocean.com
ns2.digitalocean.com
ns3.digitalocean.com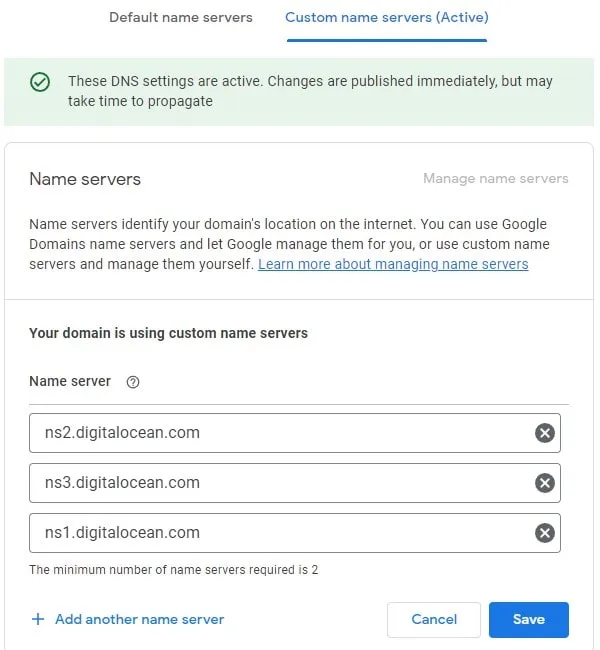
- Once you add the DigitalOcean name servers to your DNS Provider. Click on Networking from the left pane, and after that click on Domains.
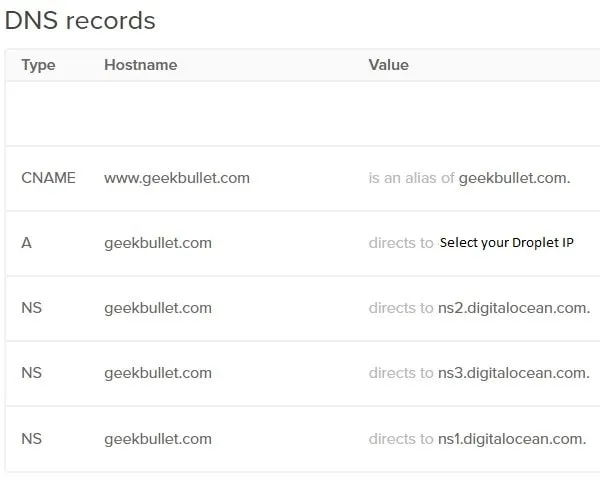
- Enter your domain name without www and click on Add Domain.
- Next, in A Record, enter @ in hostname, and after that, in “will redirect to” select the server that you’ve created. Click on Create Record.
- Next, in CNAME, enter your domain name with www and in value without www. And, click on Create Record.
Alternatively, you can simply go to the DNS settings of your domain provider. And, can add an A name and CNAME Record. This means, no need to enter Digitalocean name servers.
That’s it, you have successfully completed DNS Settings. Now, you can use the DNS Checker website to check domain name is pointed correctly to the droplet IP address or not. It might take time because it depends on the domain provider.
Find CyberPanel Login Password and Login
- Open DigitalOcean Again, and click on your droplet name.
- Droplet Management screen will appear, wait for everything to load up. And, click on Console.
- A new window will get open, and once Droplet gets connected. It will say Do you wish to update the system now?. Type Y and press enter.
- The server update will get started. It might take a few minutes to complete. So, don’t close it.
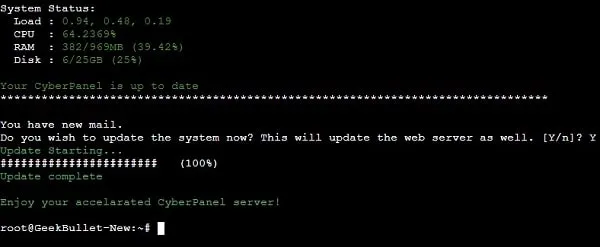
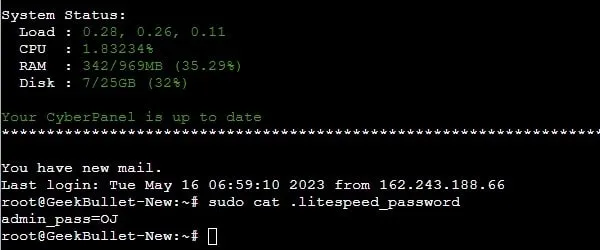
- Once the update gets completed. Type the following command to find out the CyberPanel login password.
sudo cat .litespeed_password- The command will now show you the LiteSpeed Server (CyberPanel) Admin Password. Copy the password and put it into Notepad. This password will be useful whenever you want to log in CyberPanel Dashboard.
- You will find the CyberPanel login address in the same web console. It will be like this. Replace the IP Address with the actual IP address of your Droplet.
https://IP Address:8090- Open the CyberPanel login address in the new tab.
- Your Connection is Not Private screen will appear. Basically, it’s an SLL Warning. Click on Advanced > Proceed to IP Address.
- The CyberlPanel login page will get open. Enter admin in username. And, in the password do enter the Litespeed Password that you got from the web console. Click on Sign In.
Create a Website in CyberPanel
- Go to Websites > Create Website.
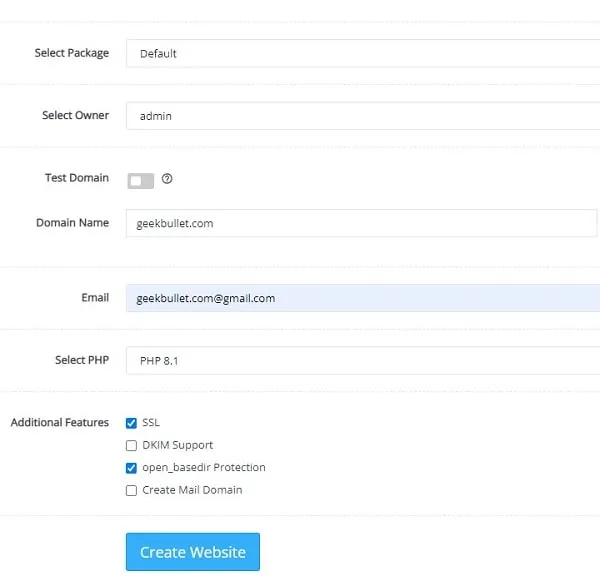
- Turn Test Domain off. In Select Package, do select Default.
- Select the admin in the Select Owner.
- In Domain Name, enter your website address without www.
- Enter your Email and after that Select the most recent PHP version.
- In Additional Features, select SSL and open_basedir protection.
- Make sure all details are entered correctly.
Note: Before you hit the Create Website button, make sure the domain is hitting your IP address. Use the DNS Checker website and check for A record. Else, SSL will create issues.
- Click on Create Website.
- You will now see a progress bar. Wait until you see the “Website Successfully Created” Message.
- Now, open your website domain in a new tab. And, you will see the “CyberPanel Installed” Message. And, you will also see the SSL padlock in the address bar.
Issue Hostname SSL
- From the left pane, click on SSL > Hostname SSL.
- Now, select the website and click on “Issue SSL”.
- You will get a success message that SSL is issued to the hostname. Now, you can access Cyberpanel on the domain instead of the IP address.
- Now, open CyberPanel through your domain.
https://domain:8090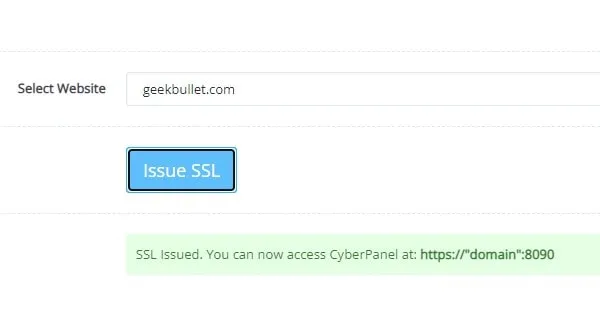
- After that, log in using the same LiteSpeed password that you’ve used before.
Install WordPress
- Open CyberPanel using your domain. Click on Websites > List Website.
- Site details will get open, click on Manage.
- You will now see an SSL certificate that will expire in 89 days. It will auto-renew before 89 days, so no worries. Or, you can manually reissue it from CyberPanel later.
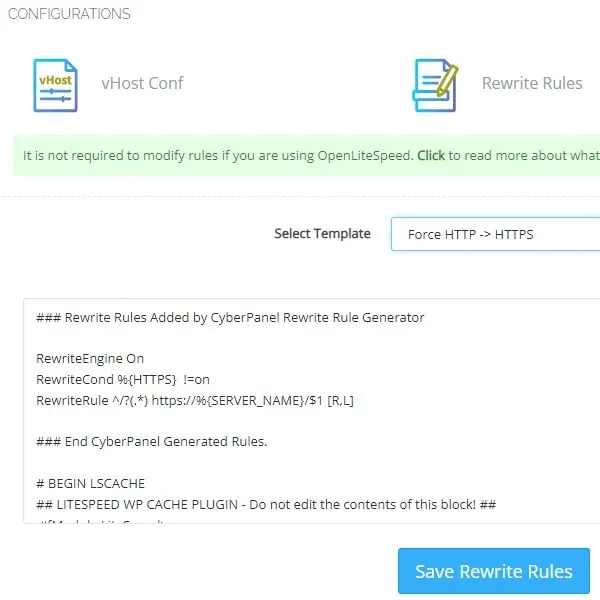
- Scroll down and click on Rewrite Rules.
- From Select Template, do select “Force HTTP > HTTPS”. And, click on “Save Rewrite Rules”.
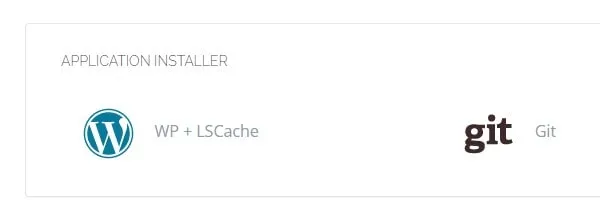
- Scroll down and you will see Application Installer. Click on WP + LSCache.
- The Install WordPress page will get open.
- Do enter your blog title, login username, and password. After this, enter your email and click on Install Now.
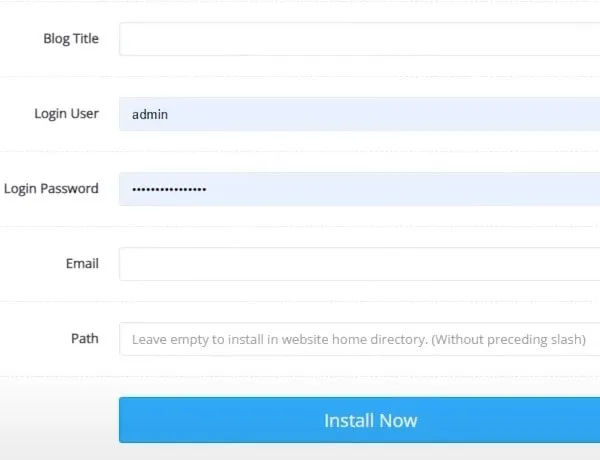
Note: Don’t enter anything in the path so that WordPress will get installed into the home directory. Also, do remember your WordPress username and password before you hit the “Install Now” button.
- Within a few minutes, WordPress will get installed and you will get Sucessfully Installed message.
- Now, when you open your domain you will see a Hello World Page. Now, you can log in to your WordPress site and can customize your website using themes and plugins.
https://domain/wp-adminNote: Replace the domain with the actual domain name of your website. And, after that, you can log in using your WordPress login details.
So, that’s how you can Install WordPress on CyberPanel with OpenLiteSpeed on DigitalOcean. If you have any questions, or you’re facing any trouble, then you can leave a comment.